Ice Cubes Meets AI
How I integrated OpenAI API into Ice Cubes, a SwiftUI open source Mastodon client, to make a lightweight AI assistant.

I invite you to read my previous story about Ice Cubes if you didn’t already, which will provide a bit more context to this article.
Ice Cubes was born when the world was already in the AI crazy world Era that we are today, so of course, before releasing the first version of the app I decided to play a bit with OpenAI API.
I didn’t wanted to create something excessive, useless, or anything that could work against the spirit of Mastodon. And being a non native English speaker, I knew exactly what I wanted to have. A basic assistant in the Toot composer.

In the above screenshot you’ll most probably be able to get the gist of what the AI assistant of Ice Cubes is capable of. The final product is a menu with a few command that you can invoke while typing text.
Initially I only had three options, the most important one to me, to correct my text and make it grammatically correct. One to shorten the text, so if you’re over your Mastodon instance characters limit, ChatGPT can make your text fit. And the last one is a fun twist, it’ll take your current text and add a bit of… well, joy to it.
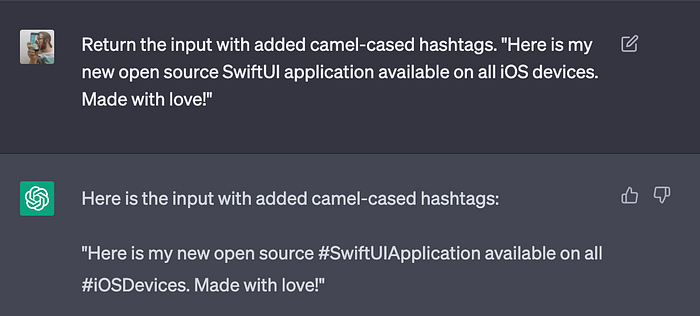
And then the hashtags entries were added quite recently. They’re taking your text and ask ChatGPT to fill
All of this require two things that I’ll detail below:
1. An OpenAI client so the app can query OpenAI API.
2. Craft very specific prompt in order for ChatGPT to do the desired job, nothing more, nothing less (this is the harder part).
Ice Cubes OpenAI client
The OpenAI API is well documented and I needed to call only the Chat API, so my client is pretty straightforward & simple.
protocol OpenAIRequest: Encodable {
  var path: String { get }
}

public struct OpenAIClient {
  private let endpoint: URL = .init(string: "https://api.openai.com/v1/")!

  private var APIKey: String {
    // sk-...
  }

  private var authorizationHeaderValue: String {
    "Bearer \(APIKey)"
  }

  private var encoder: JSONEncoder {
    let encoder = JSONEncoder()
    encoder.keyEncodingStrategy = .convertToSnakeCase
    return encoder
  }

  private var decoder: JSONDecoder {
    let decoder = JSONDecoder()
    decoder.keyDecodingStrategy = .convertFromSnakeCase
    return decoder
  }

  public struct ChatRequest: OpenAIRequest {
    public struct Message: Encodable {
      public let role = "user"
      public let content: String
    }

    let model = "gpt-3.5-turbo"
    let messages: [Message]

    let temperature: CGFloat

    var path: String {
      "chat/completions"
    }

    public init(content: String, temperature: CGFloat) {
      messages = [.init(content: content)]
      self.temperature = temperature
    }
  }

  public enum Prompt {
    case correct(input: String)
    case shorten(input: String)
    case emphasize(input: String)
    case addTags(input: String)
    case insertTags(input: String)

    var request: OpenAIRequest {
      // Request with the prompts
    }
  }

  public struct Response: Decodable {
    public struct Choice: Decodable {
      public struct Message: Decodable {
        public let role: String
        public let content: String
      }

      public let message: Message?
    }

    public let choices: [Choice]

    public var trimmedText: String { ... }
  }

  public init() {}

  public func request(_ prompt: Prompt) async throws -> Response {
    do {
      let jsonData = try encoder.encode(prompt.request)
      var request = URLRequest(url: endpoint.appending(path: prompt.request.path))
      request.httpMethod = "POST"
      request.setValue(authorizationHeaderValue, forHTTPHeaderField: "Authorization")
      request.setValue("application/json", forHTTPHeaderField: "Content-Type")
      request.httpBody = jsonData
      let (result, _) = try await URLSession.shared.data(for: request)
      let response = try decoder.decode(Response.self, from: result)
      return response
    } catch {
      throw error
    }
  }
}
The prompts
The prompts is what I think the more interesting part. As of today I consider myself an AI prompt engineer than an iOS engineer 😆
public enum Prompt {
case correct(input: String)
case shorten(input: String)
case emphasize(input: String)
case addTags(input: String)
case insertTags(input: String)
var request: OpenAIRequest {
switch self {
case let .correct(input):
return ChatRequest(content: "Fix the spelling and grammar mistakes in the following text: \(input)", temperature: 0.2)
case let .addTags(input):
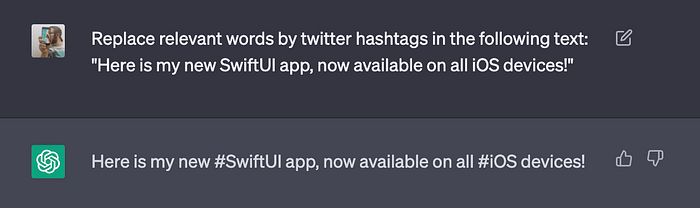
return ChatRequest(content: "Replace relevant words with camel-cased hashtags in the following text. Don't try to search for context or add hashtags if there is not enough context: \(input)", temperature: 0.1)
case let .insertTags(input):
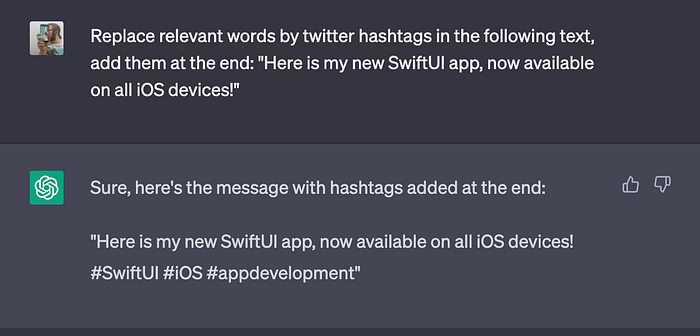
return ChatRequest(content: "Return the input with added camel-cased hashtags at the end of the input. Don't try to search for context or add hashtags if there is not enough context: \(input)", temperature: 0.2)
case let .shorten(input):
return ChatRequest(content: "Make a shorter version of this text: \(input)", temperature: 0.5)
case let .emphasize(input):
return ChatRequest(content: "Make this text catchy, more fun: \(input)", temperature: 1)
}
}
}- Return the input with added camel-cased hashtags at the end of the input. Don't try to search for context or add hashtags if there is not enough context:
- Replace relevant words with camel-cased hashtags in the following text. Don't try to search for context or add hashtags if there is not enough context:
- Return the input with added camel-cased hashtags at the end of the input. Don't try to search for context or add hashtags if there is not enough context:
- Make a shorter version of this text:
- Make this text catchy, more fun:
When you invoke OpenAI chat API, you’re basically talking to ChatGPT like you would in the web interface. So the commands are straight English.
To tweak a bit the hashtags prompts, I actually debugged it using ChatGPT web interface.
My first iteration was very simple and it often replaced actual word with hit or miss hashtags. And sometimes ChatGPT was even rewriting the text in order to add some context.
As you can see above the result was not very good. So I’ve actually asked ChatGPT how I could improve the prompt in order to fit what I wanted.
I’m just highlighting the process here in a very simple form, I actually had quite a bit if back and forth with ChatGPT in order to ship my actual prompt with the app. But I think that when working with generative AI, this is one of the most important part. Use the AI to debug itself. Wether you want to program the chat with a prompt, system rules, or making a ChatGPT plugin (more on this in a future article).
Here is two variations, one with the hashtags inline
And one with the hashtags added at the end
Another important parameter is the temperature, it’s not something you can tweak on ChatGPT but you can tweak it in the API parameter. The TL;DR is that it determine the randomness of the output.
For temperature, higher values like 0.8 will make the output more random, while lower values like 0.2 will make it more focused and deterministic. In the case of max tokens, if you want to limit a response to a certain length, max tokens can be set to an arbitrary number. This may cause issues for example if you set the max tokens value to 5 since the output will be cut-off and the result will not make sense to users.
If you look at my prompts, I pass very low temperature for almost all of them apart for the funnier one. Indeed, I want very deterministic output in my case as I have very clear prompts / rules based on the user input that ChatGPT should not alter too much.
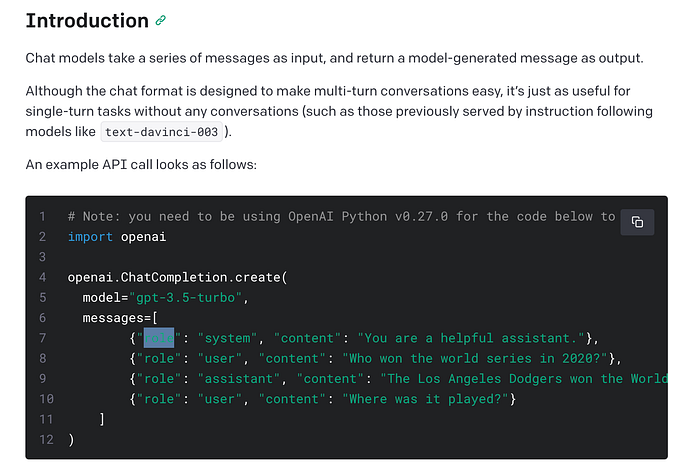
Also, I went the simple route, you can fine tune it better by pre programming ChatGPT with a better initial context. Looking at this example on the Chat API documentation for example, you can fill the context with a pre made dialog between the system rule, user message and assistant so it can understand better what will be your next input and what should be it response.
OpenAI API are very powerful and very wide, I played a lot with their playground, where you can try out any API directly in the web interface without writing a single line of code.
Last but not least, Ice Cubes isfully open source, you can fully browse the code on GitHub:
And you can download it directly from the App Store:
Thanks for reading! 🚀
